One of the cool things in Azure is that we can provision WordPress—and many other web applications for that matter—in minutes and scale it with a click, and forget about the underlying operating system or virtual machine. Yet every password reset or contact-form message still vanishes because there’s no local SMTP server. After a deep dive through connectors, SPF tweaks, and plugin settings, I nailed a clean setup using Exchange Online SMTP relay—so every password reset, comment alert, or form submission lands in the right inbox.
Why WordPress on Azure Won’t Email by Default
Azure’s WordPress App Service removes the burden of patching servers, but it also removes the local SMTP service that WordPress expects. As a result, no mail leaves the site until you connect an external relay.
Try a cloud email delivery system instead
Better than using the SMTP relay option described here, I have since then opted to use SendGrid, Mailjet or similar, which can be deployed from within Azure. The free version of SendGrid allows for 25,000 emails per month, which is plenty for our needs. In fairness, I would rather pay for SendGrid, MailJet (or another reliable provider) rather than going the SMTP relay route.
Allow WordPress to Talk to Exchange Online
First, configure Exchange Online to trust the WordPress app’s outbound IP address. The full procedure is covered in this article under “Option 3—Configure a connector to send mail using Office 365 SMTP relay.” I picked this route because I don’t need a reply-enabled mailbox and I still want to reach external recipients. Here’s the checklist:
Configure the mail flow connector in the Exchange Admin Centre
- Sign in to the Exchange Admin Centre.
- Create a new mail-flow connector and enter the outbound IP address of your Azure WordPress site.
- Save the connector so Exchange trusts any message that originates from that address.
Create or amend the DNS SPF record
Every receiving mail server checks the SPF record for your domain. If the sending IP isn’t listed, the message can fail SPF and slide straight into the spam folder—or get blocked entirely. Most Office 365 tenants already have:
v=spf1 include:spf.protection.outlook.com ~all
Your domain must have only one SPF line. So you must edit—not duplicate—this SPF record to include the IP addresses you want to authorise. For example:
v=spf1 ip4:10.5.3.2 ip4:10.5.3.3 include:spf.protection.outlook.com ~all
Now any server that sees mail from 10.5.3.2–3 can confirm, “Yes, this domain authorized that IP,” and your messages avoid the spam trap.
Install and Configure WP Mail SMTP Plug-in
Next, connect WordPress to Exchange Online. Install the WP Mail SMTP plugin, then—if you run a multisite—activate it in Network Admin and inside every sub-site. Configure the relay settings once at the network level and again for each sub-site so all sites send mail through the same connector.
Here is an example of how the plug-in is configured. Make sure you get your SMTP server name right, which you can get from your MX record of the DNS record of your domain.
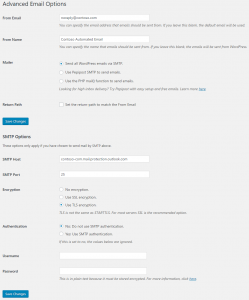
That’s pretty much it. After enabling the plug-in with the above configuration settings, my WordPress sites were email to send emails.