Configure Azure WordPress web app to work with Exchange Online SMTP relay
I am on the process of recreating the public websites for my company using WordPress (which will do just fine for now). One of the cool things in Azure is that we can provision WordPress (and many other web applications for that matter) on a platform-as-a-service model, meaning that we don’t have to worry about the underlying operating system or virtual machine. With just a few clicks we can have a full-blown WordPress site up and running on Azure, and with a few more clicks we can scale the deployment up or out. It is a fantastic service, but there is one aspect that is not as straightforward: emails. By default WordPress will not send any sort of email notification since there is no SMTP server in the local host. I wanted to configure WordPress to use my Office 365 Exchange Online via SMTP relay, which I managed to do after a few hours of research. Here is how is done.
Try a cloud email delivery system instead
Better than using the SMTP relay option described here, I have since then opted to use SendGrid, Mailjet or similar, which can be deployed from within Azure. The free version of SendGrid allows for 25,000 emails per month, which is plenty for our needs. In fairness, I would rather pay for SendGrid, MailJet (or another reliable provider) rather than going the SMTP relay route.
First, we need to configure Exchange Online to accept connections from the IP address of the WordPress web app. The steps required are covered in this article under “option 3” (i.e. Configure a connector to send mail using Office 365 SMTP relay). This is the required option for me because I do not want to create a mailbox to receive replies, and I also want to send emails to external addresses. The summary of the tasks that need to be followed are as follows:
- Configure the mail flow connector in the Exchange Admin Centre. The Exchange admin centre can be accessed via the admin dashboard on portal.office.com. We basically want to allow connections coming from the IP address of the WordPress web application in Azure.
- Create or amend the DNS SPF record. This is very important to ensure that emails are not caught on SPAM. A SPF record containing the IP address of the WordPress web application must be created in the DNS for the domain used by Exchange. Now it is very likely that those with Office 365 already have such record, and perhaps with another IP address or addresses. There should be only one such SPF record per domain. So if we need to have multiple IP addresses, we simply append the additional IP addresses into the record. For example, the entry below has 3 IP addresses:
10.5.3.2, 10.5.3.3 and 10.5.3.4.
v=spf1 ip4:10.5.3.2 ip4:10.5.3.3 ip4:10.5.3.4 include:spf.protection.outlook.com ~all
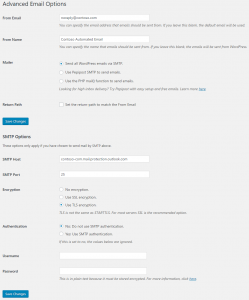
The next step is to enable WordPress to work with the Office 365 Exchange Online. To do so, I installed the WP-Mail-SMTP plug-in. If you are running a multi-site installation of WordPress, make sure that the plug-in is enabled at the network level as well as in all sub-sites. Also the plug-in must be configured individually at the network level and in all sub-sites.
Here is an example of how the plug-in is configured. Make sure you get your SMTP server name right, which you can get from your MX record of the DNS record of your domain.
That’s pretty much it. After enabling the plug-in with the above configuration settings, my WordPress sites were email to send emails.
1 Comment
Leave a comment
Blog Categories
Recent Posts
- My 12-Year-Old Just Bypassed Windows 11 Parental Controls—and It’s Worse Than You Think
- Microsoft Dynamics: Unable to load plug-in assembly
- SLOTH: A model about user’s unreasonable expectations of systems design
- Wii U Haxchi and CBHC: There is a better option
- Old Windows? No Microsoft Store for you!

.png)
.png)
.png)
.png)


A very useful and in-depth article on WordPress and how to speed up and increase the reader experience for your WordPress site with Microsoft Azure's Content Delivery Network service – Microsoft Azure CDN.