In my previous post of this series we discussed how to apply our previously defined sales pipeline through the customisation of the Opportunity entity form. We went through the design of the Opportunity form, which included the addition of fields built-in fields which aren’t part of the default form, and we added some scripts for the calculation of our probability matrix.
Important Update: This article series has been written before the release of Dynamics CRM 2011 Update Rollup 12 (also known as Polaris). You might continue to read the articles in this series, but it is strongly recommended that you read this addendum before performing any customisations suggested in the series.
In this final post we will go through the creation of some workflows that will be part of our sales pipeline process.
Overview of the processes
We are going to create three workflows for the Opportunity entity. One of these workflows, the main one entitled Sales Process, will be triggered with the creation of an opportunity. This workflow is the one which the Sales Pipeline report will use for the sales pipeline phases. The second workflow entitled Sales Process – Post Mortem is a child process, which will be called by the main Sales Process workflow when the opportunity is marked as lost or won. Finally, the third workflow entitled Sales Process – Reopen of Opportunity will be triggered only when an opportunity is reopened (that is, it status changes from closed to open).
So let’s start by adding the first workflow. I assume you’re already logged into Dynamics CRM through an account that has administrative or customisation privileges.
Sales Process workflow
As mentioned in a previous post of this series, the default Sales Pipeline report that comes with Dynamics CRM relies on a workflow of the Opportunity entity to show the different stages of the Sales Pipeline. Therefore we are going to create a workflow for this purpose with the same stages of our sales pipeline as we did to customise the Opportunity form in my previous post.
All that this workflow is going to do is to move through its stages as the sales process progresses so the Sales Pipeline report can make use of it. However, you might as well add your own actions to the stages of this workflow if you wish to do so.
- Add a new blank process of the category workflow for the entity Opportunity entitled
Sales Process:
Process name:Sales Process
Entity:Opportunity
Category:Workflow
Type:New blank process
Click on OK to confirm your settings and load the workflow design window.
Editing workflows: It doesn’t matter what name you give to your workfow and you can also rename and modify workflows at a latter stage if you want. However, in order for a workflow to work it must be activated, and activated workflows can’t be modified. If you wish to modify a workflow at a latter stage, whether to change its name or to modify its actions, you will have to deactivate the workflow.
- In the workflow design window under the General tab, make sure you set the process properties as follows:
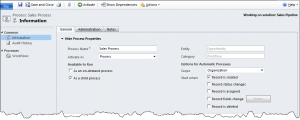
Process Name: Sales Process
Activate As:Process
Available to Run:As a child process
Scope:Organization
Start when:Record is created - Next we will start adding the stages of the workflow. Click on Add Step and select Stage and name the first stage
1 - Prospect. Repeat these steps to add two more stages:2 - Proposaland3 - Negotiation.
Workflow steps – Naming stages and describing actions: Dynamics CRM allows you to provide a name/description for every step in your workflow, which are mandatory for the stages of a workflow, but are optional for the sub-steps (i.e.: “actions”) within a stage.
Remember that the name of the stages will be used by the Sales Pipeline report, so for the sake of consistency they must reflect the same names we defined for the Sales Pipeline in the previous posts of this series.
However I will not be telling you what descriptions to use for the steps in each stage since this is irrelevant for the workflow to work, but you can refer to the screenshots below as they show the descriptions I have provided for the actions.
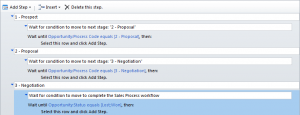
Now under each stage we must add a wait condition with a parallel wait branch. The idea is that the workflow is waiting either for the opportunity to move to the next stage, or for the opportunity to close. If the Process Code field (which is “disguised” as the Pipeline Phase field in the form) changes to the next option, then the workflow will move to the next phase. Otherwise, if the opportunity record is closed as lost or won, then call the Sales Process – Post Mortem workflow to deal with the closed opportunity, and stop the workflow.
- Under the first stage (1 – Prospect), select the line that says Select this row and click Add Step. Click on Add Step and select Wait Condition.
- Click where it says (click to configure) and set the condition as:
Opportunity:Proccess Code equals [2 - Proposal]. - Repeat the two previous steps (4 and 5) for the second stage. However, make sure that for this stage we are waiting for the condition
Opportunity:Process Code equals [3 - Negotiation]. - Under the third and last stage will add a wait condition just as we did for the other two previous steps. However this time we want to configure the waiting condition to be
Opportunity:Status equals [Lost;Won].
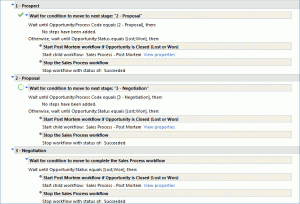
We should now have the steps configured for our workflow as the following screenshot:
The workflow as it is will move through the stages as the Opportunity’s Process Code field (again, which is “disguised” as Pipeline Phase field in the form) is updated. However, what if the opportunity is closed? For that we must account for other conditions. Our next step will be to create the workflow that will be called by this workflow when the opportunity closes.
- For now, click on Save and Close so we can proceed to design our next workflow. We will come back to this workflow afterwards to add the required parallel wait branches.
Sales Process – Post Mortem workflow
This next workflow is pretty straightforward. We are going to create a child workflow which will be called by our main Sales Process workflow when an opportunity is either lost or canceled, and perform given actions accordingly.
- Add a new blank process of the category workflow for the Opportunity entity entitled
Sales Process - Post Mortem:
Process name:Sales Process - Post Mortem
Entity:Opportunity
Category:Workflow
Type:New blank process
Click on OK to confirm your settings and load the workflow design window. - In the workflow design window under the General tab, make sure you set the process properties as follows:
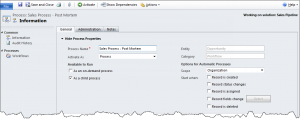
Process Name: Sales Process - Post Mortem
Activate As:Process
Available to Run:As a child process
Scope:Organization
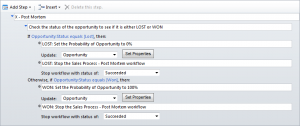
Start when:Record is created - Next we will design the workflow as per the screenshot below. Click on Add Step and select Stage and name the stage
X - Post Mortem. Note: We are just adding this stage for consistency, since this workflow doesn’t require stages. - Select the line that says Select this row and click Add Step. Click on Add Step and select Check Condition.
- Click where it says (click to configure) and set the condition as:
Opportunity:Status equals [Lost]. - Click on the next line where it says Select this row and click Add Step. Click on Add Step and select Update Record. Make sure that where it says Update the Opportunity entity (the primary entity) is selected, and click on Set Properties. In the form, click on the Probability (%) field and type
0, then click on Save and Close to return to the workflow designer.
Editing read-only fields: If you remember from the previous post in the series, the Probability (%) field has been set as read-only when customising the Opportunity form. We will need to temporarily remove the read-only restriction of the Probability field and re-publish our customisation in order to be able to specify values for this field.
- Back at the workflow designer, make sure that the last step we added is selected (the one that updates the Opportunity’s probability) then click on Add Step and select Stop Workflow. Make sure that where it says Stop workflow with status of the option Succeeded is selected.
- Now click on the line that says If Opportunity:Status equals [Lost] in order to select the whole condition. Click on Add Step and select Conditional Branch.
- At the line that says Otherwise, click where it says (click to configure) and set the condition as:
Opportunity:Status equals [Won]. - Repeat the same steps as step 6 above. However, this time when setting the properties in the form, type
100in the Probability (%) field. - Finally, repeat the same steps as step 7 above.
We should now have the steps configured for our workflow as the following screenshot:
- Click on Save and Close so we can proceed to update the previous workflow.
Sales Process workflow – revisited
Now we must update our Sales Process workflow so it can trigger the Sales Process – Post Mortem workflow we just created when an opportunity is closed. SO lets proceed to edit the Sales Process workflow.
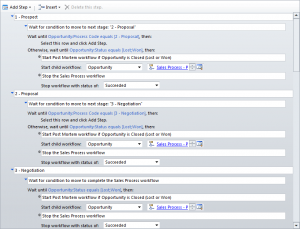
- Under the first stage (1 – Prospect), click on the line that says Wait until in order to select the whole condition. Click on Add Step and select Parallel Wait Branch.
- At the line that says Otherwise, click where it says (click to configure) and set the condition as:
Opportunity:Status equals [Lost;Won]. - Click on the next line where it says Select this row and click Add Step. Click on Add Step and select Start Child Workflow. Make sure that where it says Start child workflow the Opportunity entity (the primary entity) is selected, and then select the
Sales Process - Post Mortemworkflow in the lookup field. - Make sure that the last step we added is selected (the one that starts the child workflow) then click on Add Step and select Stop Workflow. Make sure that where it says Stop workflow with status of the option Succeeded is selected.
- Repeat all previous steps (steps 1-4) for the second stage. Leave the last stage as it is.
We should now have the steps configured for our workflow as the following screenshot:
The workflow now will move through the stages as the Opportunity’s Process Code field (again, which is “disguised” as Pipeline Phase field in the form) is updated. If the opportunity is closed (either lost or won) the workflow will call the Sales Process – Post Mortem workflow and stop the workflow as successful.
Actions: You might have noticed that at each stage of our workflow, all that we do is wait we have added no actions to take place. The idea of this workflow is simply to support the Sales Pipeline report and introduce the design of workflows in the process. Feel free to add your own actions to these workflows if you wish to do.
- Click on Save and Close so we can proceed to create our last workflow.
Now consider this: The Sales Process workflow follows the life-cycle of an opportunity from the moment it is created. However, what would happen if a user re-opens an opportunity record? At the moment, nothing would happen. But we can create one final workflow to cover this scenario.
Sales Process – Reopen of Opportunity
This final workflow will be triggered when an opportunity status is changed. If the status is changed to open (i.e.: the opportunity is re-opened), then the Sales Process workflow will be called. Otherwise, the workflow will stop as succeeded.
- Add a new blank process of the category workflow for the entity Opportunity entitled Sales Process – Reopen of Opportunity:
Process name:Sales Process - Reopen of Opportunity
Entity:Opportunity
Category:Workflow
Type:New blank process
Click on OK to confirm your settings and load the workflow design window. - In the workflow design window under the General tab, make sure you set the process properties as follows:
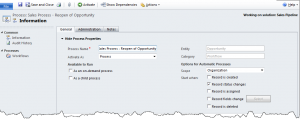
Process Name: Sales Process - Reopen of Opportunity
Activate As:Process
Available to Run:no option selected
Scope:Organization
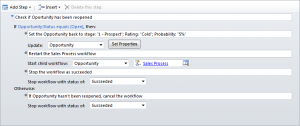
Start when:Record status changes - Click on Add Step and select Check Condition.
- Click where it says (click to configure) and set the condition as:
Opportunity:Status equals [Open]. - Click on the next line where it says Select this row and click Add Step. Click on Add Step and select Update Record. Make sure that where it says Update the Opportunity entity (the primary entity) is selected, and click on Set Properties. In the form, click on the Probability (%) field and type
5, for the Rating field selectColdand for the Process Code field select1 - Prospectthen click on Save and Close to return to the workflow designer. - Back at the workflow designer, make sure that the last step we added is selected (the one that updates the opportunity’s probability, rating and process code) then click on Add Step and select Start Child Workflow. Make sure that where it says Start child workflow the Opportunity entity (the primary entity) is selected, and then select the
Sales Processworkflow in the lookup field. - Make sure that the last step we added is selected (the one that starts the child workflow) then click on Add Step and select Stop Workflow. Make sure that where it says Stop workflow with status of the option Succeeded is selected.
- Now click on the line that says If Opportunity:Status equals [Open] in order to select the whole condition. Click on Add Step and select Default Action.
- Under Otherwise select the line that says Select this row and click Add Step. Click on Add Step and select Stop Workflow. Make sure that where it says Stop workflow with status of the option Succeeded is selected.
We should now have the steps configured for our workflow as the following screenshot:
- Click on Save and Close so we can proceed to activate our workflows.
Activating and testing the workflows
After saving and publishing our workflows, our next step is to activate our workflows so we can test them.
- After activating the workflows, proceed to create an opportunity and save it without closing it.
- If you click on Workflows under Procecces at the left-hand side navigation pane in the Opportunity form, you will be able to see the associated Sales Process workflow which has been triggered upon the creation of this Opportunity record.
- Go back to the General tab of the Opportunity form and change the Pipeline Phase from
1 - Prospectto2 - Proposal. Now if you go back to the associated workflow view (see previous step) and click on the Sales Process workflow, you can see its progress.
Workflow stages: Unfortunately Dynamics CRM 2011 workflow designer only allow a linear and sequential progression through the stages of a workflow. In practical terms, this means that from Stage 1 we can only progress to Stage 2, from Stage 2 to Stage 3 and so forth; and we can’t jump a stage or go backwards on stages. This is why we added the bonus JScript in the previous post of the series to enforce users to follow a linear and sequential progression. If you want to create a workflow that allow jumping back and forth through its stages, you will have do design the workflow using Visual Studio.
Update May/2012: Even though the Dynamics CRM 2011 workflow designer doesn’t allow us to jump stages (e.g.: like a “GOTO” statement), we could still progress through all the stages if a user jumps forward by adding additional conditionals, and even support users moving backwards through additional parallel wait branches and restarting the Sales Pipeline workflow as a child workflow from itself. Because this would significantly increase the complexity of this workflow, I decided to cover this scenario in subsequent post.
- Now proceed to view all of the open opportunities. At the Ribbon, click on Run Report and select the Sales Pipeline report. When prompted to select records, select All applicable records then click on Run Report.
- When the report finish to load, at the top where it says Group by Sales Process select
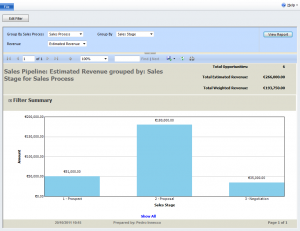
Sales Process(the name of our workflow) from the drop-down. Where it says Group By selectSales Stage. Then click on View Report to update the report. We should now see the opportunities estimated revenue grouped by the sale stages.
The report takes the sale stages from the stages of our Sales Process workflow. You might be wondering why couldn’t this report make use of the same field as the pipeline chart does in the previous post of this series. I asked myself the same question when I first came across this report. However it does make sense to have the report based on the workflow stages and the chart on an entity field; particularly if you have complex workflows and sub-stages for dealing with different products or business units.
Wrapping up
Wow… That was a lot of writing. Through the course of this series we introduced a lot of concepts for creating a functional sales pipeline in Dynamics CRM 2011. Through the customization of the Opportunity entity we also introduced some useful JScripts which calculate fields and remove options from option sets. Also through the design of workflows we introduced the concepts of conditionals, waits and branches; as well the use of child workflows. I hope you enjoyed this series and that it can be a useful reference for those in the Dynamics CRM community. Thank you for stopping by!
Bonus: Challenge yourself
Update Jan/2012: Because the sales pipeline is only about open opportunities, we only covered the open stages of the opportunity in this series of posts (1 – Prospect, 2 – Proposal, 3 – Negotiation). However, let’s say that for consistency we would also like the Pipeline Phase field of a closed opportunity to show either “4 – Won” or “X – Lost”, in case someone opens the form of a closed opportunity record. How could we do that?
This can be easily dealt with by adapting our workflow to change the value of the Pipeline Phase (stepname) accordingly for when an opportunity is closed either as won or as lost. As for our Process Code (salesstagecode) field labelled as Pipeline Phase, we can either adapt our JScript to hide it when a form is disabled (using CRM_FORM_TYPE == 4) so users would only see the Pipeline Phase (stepname) in the form footer when viewing inactive records. Alternatively, we can add two additional options to the Process Code (salesstagecode) and have them always hidden from the end-user in an editable form by adapting the bonus JScript proposed in the previous post. Then the workflow would update the value of the Process Code option set according to the close status of the opportunity (either as won or as lost).
Have fun!
Comments
13 responses to “Dynamics CRM 2011: Diving into the sales pipeline – Part 3”
What an excellent tutorial! Thanks for all the effort you put into describing the detailed steps. For anyone who's not familiar with the various assumptions and limitations related to Dynamics CRM sales process tools and configuration, this will surely be a very valuable resource.
Hi Jukka. Thanks for stopping by!
What impresses me is that even some CRM experts who understand a lot about the product tend to forget some of the basics. For instance, that the Sales Pipeline report would only work if there is an Opportunity workflow with named stages. I also hope that some of the stuff introduced along this series (such as some of the JScript of the post 2 of 3) can help people in other scenarios.
You're exactly right. I think it's really a problem that the effort required in setting up a usable sales process with stages in Dynamics CRM requires understanding so many moving parts, which is why each consultant tends to have a different approach. Of course there are no "right" answers or one-size-fits-all processes in real life, but having some kind of a template to help both the end-user organizations as well as the system customizers to more easily approach the subject can certainly improve time-to-value, compared to starting from a blank slate.
You're right about having no right answers. In Dynamics CRM there is always 3 different ways (at least) to reach a solution. However this can be overwhelming to new users. For instance, concerning the Sales Pipeline Report, it was designed to work with the stages of a workflow. We could always create our own report, which could group the stages through a field instead of workflow stages; but this would require a lot of extra work and I reckon new users would be extremely frustrated with it.
Kiitos kommentit 🙂
Excellent articles – these have been really helpful and saved me hours of messing about! Minor thing to pick up on – in point 6 of the 'Sales Process – Reopen of Opportunity' section, you mention calling the 'post mortem' workflow, but in the picture it shows you calling the 'sales process' workflow. Logic suggests its the picture that is correct, as you will be intending to reopen the original workflow?
Hi Stevo,
Thank you for stopping by. You are correct in saying that the logic lies in the picture (screenshot). These things happen when we don't have an editor. I will fix the post right now.
Thanks again!
P.
Thanks for the outstanding article. What I'm confused about is that I wrote the code you laid out in Part 2 along with the Bonus code and the Pipeline Dashboard works perfectly. If I load the code on the OnLoad Form Event on the opportunity, when I create a new one and save it, it sets the pipeline phase to 1- Prospect as expected. My question is why do I need the Work Flows? Your code updates each manual change to the pipeline phase. (BTW,. I'm not using the probability logic, my client wants to set that manually). Is it just about that canned report that needs workflow stages? I can also see that I'll need something if an Opportunity is re-open to set the Pipeline Stage back to Proposal and zero out my probability percent. But I'm not sure why anyone would re-open a lost Opportunity, shouldn't they just create a new one? Thanks.
Hi Pedro,
Thanks for the great article and examples. I think that many novice developers CMR will appreciate this work.
However, in practice, users often make mistakes CRM at work. For example in a hurry to translate Opportunity in the next phase of the sale. Recovering himself, they want to return to the previous state of the sales process, but it was not there! “Bonus” does not allow them to do it.
I slightly changed the structure of your workflow “Sales Process”.
The meaning of change is that, at stages 2 and 3 will need to wait for additional events to return a value “Process Code” to “1 – Prospect” and “2 – Proposal”, respectively. In the case of a return you need to recursively run workflow “Sales Process” and stop the current.
Link to screenshot: https://www.dropbox.com/s/8w9utcy72rhp5o3/Sales%2…
Instead of “bonus” script I use the extra buttons on the ribbon in the section “Actions”. This allows you to control changes the point of sale is much better (including allowing some users to do the necessary return to the previous stage).
Standard report “Sales Pipeline” (IMHO) does not work quite correctly. Namely, when it fetches workflow records from Opportunity, it captures ALL wokflow with the selected name (including the old ones aka “Succeeded”). The proposed workflow “Sales Process – Reopen of Opportunity” is re-running workflow “Sales Process”. At the same time the old (already “Succeeded”) continues to be associated with our Opportunity. Thus, in the report fall into two (three, four, etc.) record and, of course, the grand total is completely distorted. To combat this, you can turn on the option “Automaticaly delete completed workflow jobs (to save disk space)” on the “Administartion” tab. Also you can fight this disease in any other way. For example by creating the appropriate System Job to remove the completed workflow.
In conclusion, I would note that in the “Sales Process” workflow you can add calls to another child workflow to perform any “useful” activities (as a minimum notification and management articles). But this is a topic for further development.
Good luck,
OldCat
Hi Firat,
Thanks for stopping by!
Your workflow looks great. I think it is a valid solution. The problem is of course, having to design the workflow to be able to fetch all possibilities within a given stage. Imagine if you have 6 stages within your sales process?
Also many organisations do not want users to move freely from one stage to another. Particularly they don't want users to jump stages. So I reckon that at least using the jScript to stop users from jumping from stage 2 to 4 would be a valid option.
As for the built-in Sales Pipeline report showing all workflows as an option, I don't think it happens in this case because the report doesn't show child workflows as available options, and there is only one "parent" (i.e.: non-child) workflow in this example.
As a matter of fact I think each sales process should only have one parent workflow, relying on child workflows if needed. You could have two main sales processes in order to deal with different type of sales. For example: one for private sales and another for procurements, or one for products and another for services.
In this case each sales process should have its own parent workflow, which could specify different pipeline phases. But then bear in mind you would have to create different pipeline funnels to support each sales process.
I reckon this post served its purpose, which was to introduce the sales process in Dynamics CRM 2011, and the use of jScrips in combination with workflows. I think it is great that readers can pick up on the basic concepts introduced here and then expand the sales pipeline further. To be honest my ultimate sales pipeline is way more extensive than this introduction.
Finally, while jScripts are useful, I don't like to rely 100% on them and whenever possible I would like to write workflows that would support the jScripts, even if that means duplication of work. To me the main purpose of jScripts is to provide the end-user with an immediate update of what is going on on the screen. For example, when performing automatic calculations of dynamics changes on a record. But being workflows an asynchronous process performed at the application layer instead of the browser (i.e.: the client layer), this means workflows are not succeptible to failure due to issues at the client side. I wrote an article about this here: http://pedroinnecco.com/2012/01/dynamics-crm-…
All the best,
P.
Hi,
I am new with CRM and we started to use in the end of last year. I used this great tutorial to create sales prosess for us. And now with this polaris update we got Process Driven Forms and "out of the box" sales prosess. Now we heve opportunities which have Sales prosess from this tutorial and the new ones from polaris. Pipeline report of course do not look correct. (Workflows from this tutorial are now deactivated). We would like to customize as little as possible. What should I do. Could I modify this tutorial workflow so that it works with Process Driven Forms and "out of the box" sales prosess or what do you propose.
Berst Regards Erkki
Hi Erkki,
One important thing you must do is go to the process editor in Polaris and make sure that you match the Polaris stages with your stages. Don't add the dash or the numbers in Polaris, because Polaris do that for you automatically when parsing the value to the pipeline field used by the pipeline funnel chart.
I will be reviewing my articles to add an addendum to mention Polaris and I might create a new set of sales process articles following Polaris. Yes, Polaris tend to streamline this process a little bit. But in my opinion it is far from perfect and I can't consider it a finished product. For example what if I don't want users to be able to move manually through the phases? Perhaps I would like to let users move forward but not backwards, or perhaps it should be all automatic. As the CRM architect I would like to have that option! What if I want certain conditions to be met before a user can move to the next stage?
I'm sad to say that for the moment, I am staying away from the new Polaris forms.
Hi Pedro,
thanks for the fast replay. I am looking forward to reading your addendum to Polaris if you create it.
Excellent tutorial.. Much appreciated for your efforts…